Wednesday, February 17, 2021

Query D365 ce using fetch xml in azure logic app (without cds connector)

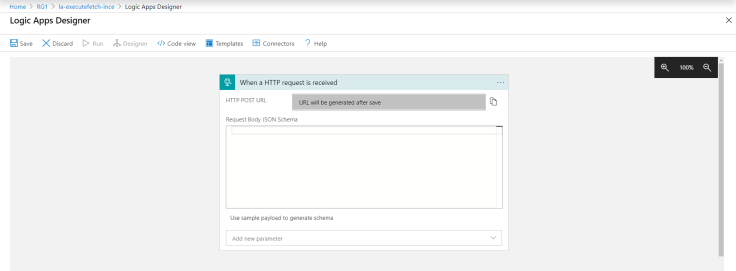
 Step 1:- Go to your azure subscription and create a new logic app (http triggere in our case):

2.png

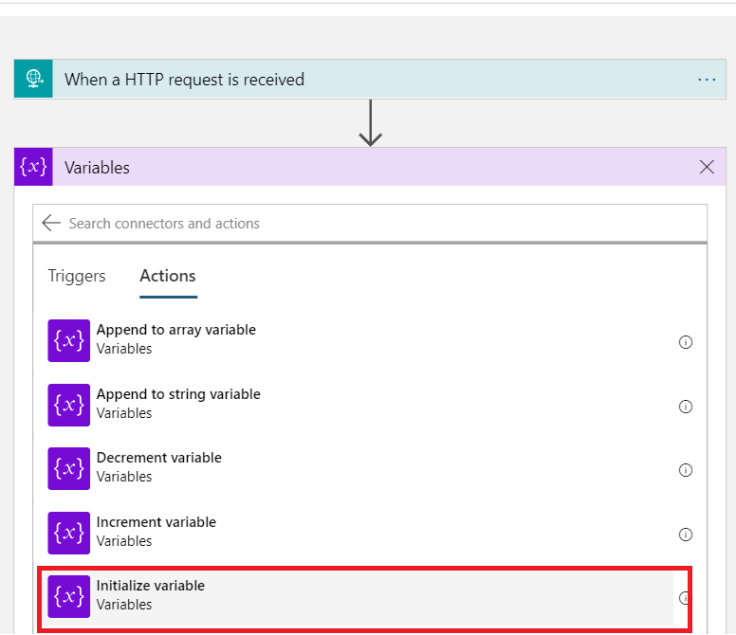
Step 2:- Save the logic app and click on next step and initialize a variable to store your fetch xml:

3.png

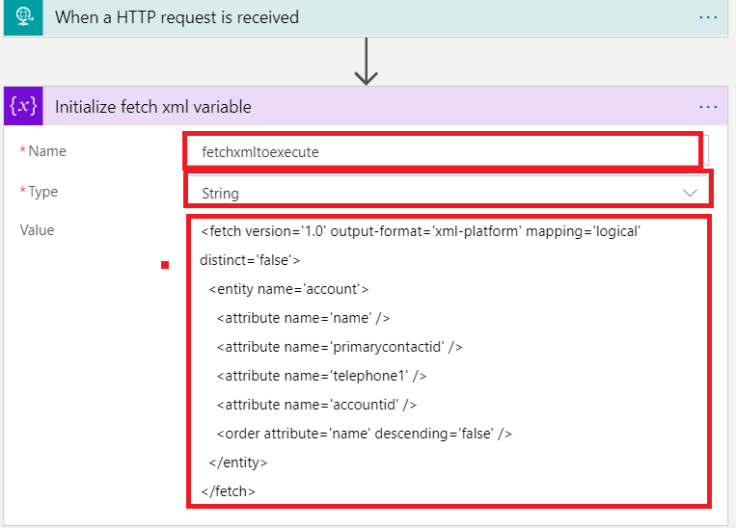
Step 3:- Name your variable and paste your fetch xml in the value:

4.png

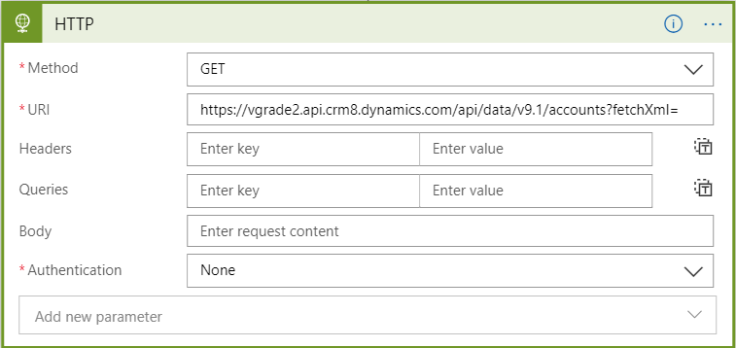
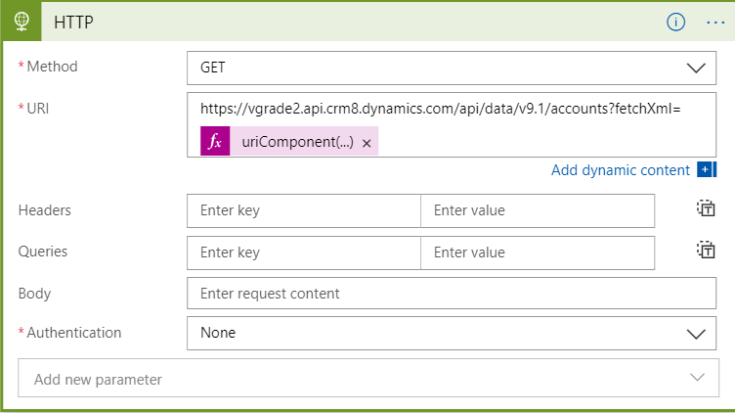
Step 4:- Click next step and select http action:-

Step 5:- Now select values as follows:

Method: Get

URI: https://<yourd365ceinstance&gt;.api.crm8.dynamics.com/api/data/v9.1/<entitypluralname>?fetchXml=

8

Step 6:- Now we have to pass encoded fetch xml declared in variable in step above.

For that click after = in URI and paste “uriComponent(variables(‘fetchxmltoexecute’))” in dynamics content section and click ok.

What it does?

This uriComponnet method encode the fetch xml stored in variable fetchxmltoexecute.

Your step should look like this:

10

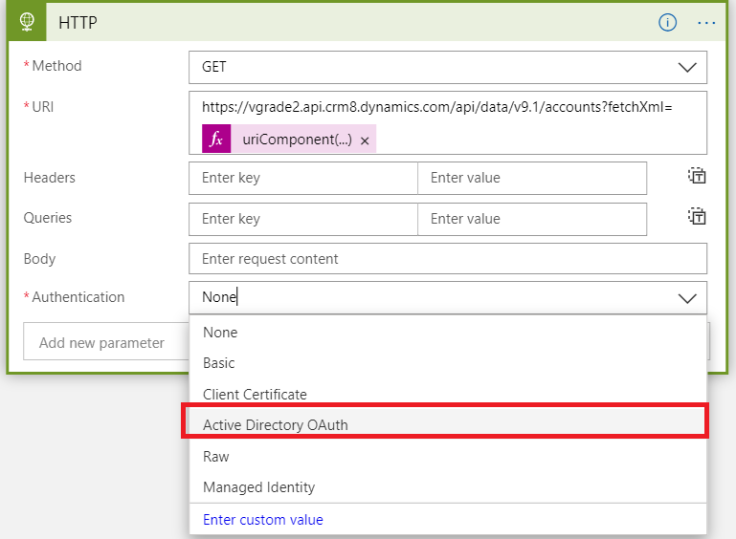
Step 7:- Now select authentication method as Active Directory OAuth:

11

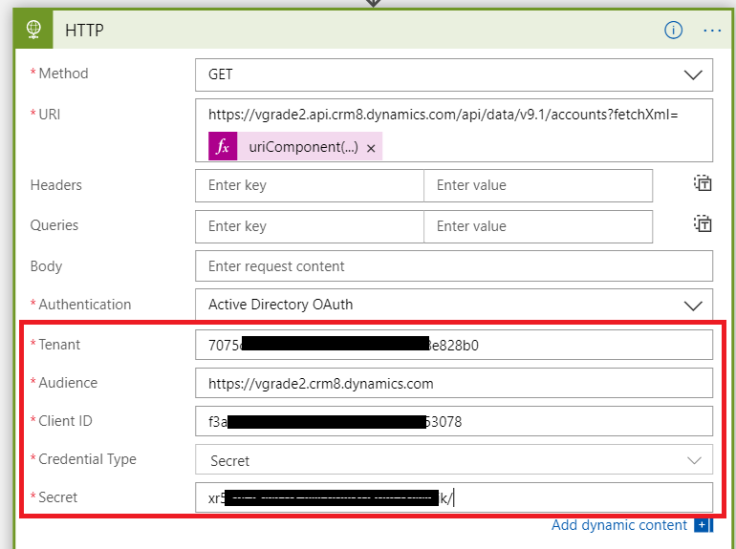
Step 7:- Set the rest of the parameters as follows:

Tenant : Azure tenant id

Audience : your CE url

Client Id: Azure ad application id/ Clientid

Credential Type: Secret

Secret : A valid secret generated for above ad app

12

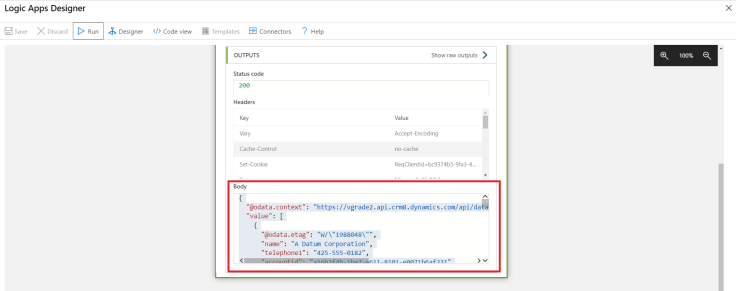
Step 8:- Now save the logic app and click on run button and wait for few seconds on same screen.

Looks like all steps got succeeded..!!

1314

Step 9:- Let’s click on last http step and see the output. Data from account record is visible in body of the action:

15.png

You can write complex fetch and pass filters dynamically and execute all those request using this way.

Similarly you can directly fo CURD operation on ce/cds using such http action and without using cds connector.  It’ll be useful in scenario like where you want to update only delta on a record in ce/cds. Then you can build your json and post the json using post/patch method on desired entity.

Hope it was helpful..!!


Link Verified : Query D365 ce using fetch xml in azure logic app (without cds connector) – Dynamics 365 CE/Power Platform, PowerApps, Power Automate, Azure by Vishal Grade

Monday, January 18, 2021

Call WorkFlow MSCRM c#

Dear All,

Please find the below code for executing workflow request


ExecuteWorkflowRequest request = new ExecuteWorkflowRequest()

{

WorkflowId = new Guid(WORKFLOWGUID),

EntityId = loopGetQuote.Id

};

// Execute the workflow.

ExecuteWorkflowResponse responses = (ExecuteWorkflowResponse)service.Execute(request);


Thursday, December 3, 2020

Filter Lookup based on Linked Entity MSCRM

 function AddCustomContactView(executionContext) {

            var formContext = executionContext.getFormContext();
            if(formContext.getAttribute("account").getValue()!=null)
            {
            var accountId = formContext.getAttribute("account").getValue()[0].id;
            var viewId = "34A611CD-8503-4DE0-8EB7-B16EEAB32EBF";
            var entity = "contact";
            var ViewDisplayName = "Contacts";
            var fetchXML = "<fetch version='1.0' output-format='xml-platform' mapping='logical' distinct='false'>" +
                "<entity name = 'contact' >" +
                "<attribute name='fullname' />" +
                "<attribute name='telephone1' />" +
                "<order attribute='fullname' descending='false' />" +
                "<link-entity name='account' from='accountid' to='parentcustomerid' link-type='inner' alias='ab'>" +
                "<filter type='and'><filter type='or'>" +
                "<condition attribute='accountid' operator='eq' uitype='account' value='" + accountId + "' />" +
                "<condition attribute='accountid' operator='under' uitype='account' value='" + accountId + "' />" +
                "</filter></filter></link-entity></entity></fetch >";
            var layout = "<grid name='resultset' jump='fullname' select='1' icon='1' preview='1'>" +
                "<row name = 'result' id = 'contactid' >" +
                "<cell name='fullname' width='300' />" +
                "<cell name='telephone1' width='125' />" +
                "<cell name='emailaddress1' width='150' />" +
                "</row></grid>";
 
            formContext.getControl("contact").addCustomView(viewId, entity, ViewDisplayName, fetchXML, layout, true);
 
        }
}

How to Run Microsoft Flow for Every one Month

Introduction: In this Blog we will see how to Run Microsoft Flow for Every one Month. Implementation Steps:   1. Navigate to  https://make.p...