Tuesday, November 9, 2021

Make All Field Read only MSCRM or Model Driven apps


Introduction:


In this blog we will see how to make all the filed as Read- Only using Javascript in MSCRM/DataVerse environment.


Implementation steps:


Copy the Below Code in your OnLoad Operation to make all the Fields Read Only


function MakeAllFieldReadOnly(){

 Xrm.Page.data.entity.attributes.forEach(

  function (attribute, index) {

      var attributeName = attribute.getName();

          Xrm.Page.getControl(attributeName).setDisabled(false);

  });

}

Monday, November 8, 2021

Comments in Microsoft Flow (Preview)

Introduction: 


In this blog we will see how to add/Edit/Delete or Resolve Comments in Microsoft flow 


Implantation Steps:


1. Navigate to https://flow.microsoft.com or based on your organization flow URL needs


2. Open or Create a New Flow


3. Once the Flow Gets Created


rampprakash_0-1636370400746.png


4. Click on the Item where you need to add Comments then CLICK Comments(Preview) at the Top


rampprakash_1-1636370544695.png


5. Then Click On New and enter the Comments


rampprakash_3-1636370720719.png


6. To add a new Comment Again click on the item in the flow then Click new and Add a new Comments


rampprakash_4-1636370804031.png


7. To Delete comment / Edit Comment or Resolve Click on the Three Dots at the right side to process it


rampprakash_5-1636370890784.png


That's it :slightly_smiling_face:

Monday, November 1, 2021

Show or Hide TIME component from Date Time in Model Driven Apps


Introduction:

In this blog we will see how to show or hide Time Component using JavaScript in Model Driven Apps/ MSCRM


Implementation Steps:


Some time Use want to Show/Hide Time Field Component based on their Requirement


rampprakash_0-1635767054619.png


To Achieve that we need to write some JavaScript to enable and disabled Component


Syntax:


formContext.getControl(arg).setShowTime(bool);


arg = Field Logical Name

bool = true/false 


To Enable time Component:


function enableTimeComponent(executionContext){
var formContext = executionContext.getFormContext();
formContext.getControl("FieldLogicalName").setShowTime(true);
}


To Disable time Component:


function enableTimeComponent(executionContext){
var formContext = executionContext.getFormContext();
formContext.getControl("FieldLogicalName").setShowTime(false);
}


That's it 

Thursday, October 28, 2021

PowerApps force sync users from Azure AD to Data Verse Environment.


Introduction:

In this Blog we will see how to Force Sync Users from Azure AD Security Group with Data Verse Environment.


Implementation steps:


1. Make Sure the user is have proper License for accessing Microsoft Data verse


2. Navigate to https://flow.microsoft.com


3. Click Flows


4. Click New --> Select Instant Cloud Flow


5. Enter the Name "FORCE SYNC USER"


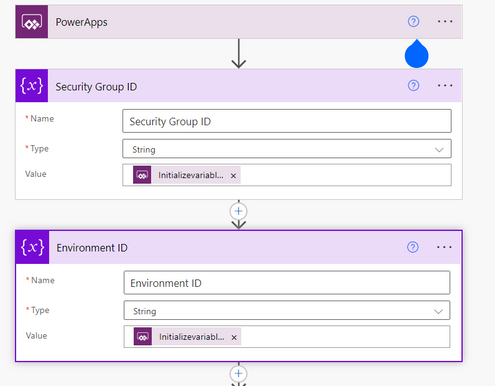
6. Create 2 Variables to get Environment ID and Group ID


rampprakash_2-1635409833116.png


7. Get the Group Members from Azure AD

rampprakash_3-1635409866548.png


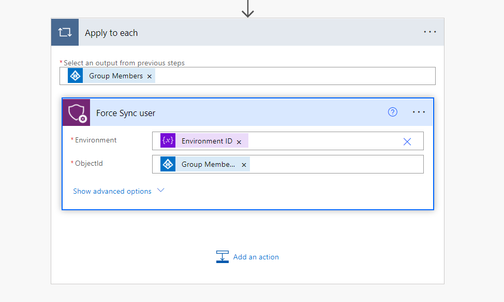
8. Then Sync the Users with FORCE SYNC USER


rampprakash_4-1635409912654.png


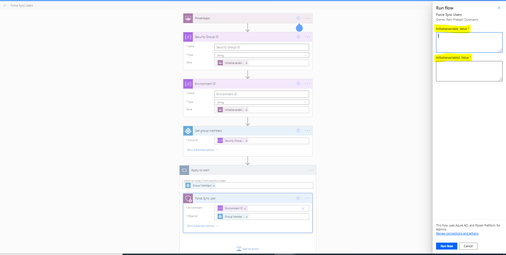
Thats it :slightly_smiling_face: Click on Test and Pass the Variables (Environment ID and Security Group ID


rampprakash_5-1635410012471.png

Tuesday, October 19, 2021

Side Panes in Model Driven Apps


Introduction:


In this Blog, we will see what are the features and how we can use Side Panes in Model Driven Apps.

Implementation Steps:


Consider a scenario, on click of a Button I need to show a HTML page in the Form. Initially we have used Dialog to display the same in the form but Microsoft have introduced a new feature to display a SIDE PAN in the Form


Syntax:


Xrm.App.sidePanes.createPane(paneOptions)


PanOptions:


You can refer to https://docs.microsoft.com/en-us/powerapps/developer/model-driven-apps/clientapi/reference/xrm-app/xrm-app-sidepanes/createpane


Sample Code to Open HTML Page:


Check Weather the pane is already opened or not. If opened Close the pane


var currentPane = Xrm.App.sidePanes.getSelectedPane();
if (currentPane !== null && currentPane !== undefined && currentPane.paneId === "PANIDUNIQUENAME") {
var promotionPane = Xrm.App.sidePanes.getPane("PANIDUNIQUENAME");
promotionPane.close();
}


Below code for Opening the HTML page in Side pan


try {       
        Xrm.App.sidePanes.createPane({
            title: "PANID",
            paneId: "PANIDUNIQUENAME",
            canClose: true
        }).then((pane) => {
            pane.navigate({
                pageType: "webresource",
                webresourceName: "/webresources/yourhtmlpage.html"
            });
        });
    }
    catch (e) {
        throw e;
    }


If you want to pass any parameter from form to HTML in Side Pan


try {      
var formContext = primaryControl;
var qs = "guidofRecord=" + formContext.data.entity.getId().replace('{', '').replace('}', ''); // guidofRecord = you can pass any dummy variables
        Xrm.App.sidePanes.createPane({
            title: "PANID",
            paneId: "PANIDUNIQUENAME",
            canClose: true
        }).then((pane) => {
            pane.navigate({
                pageType: "webresource",
                webresourceName: "/webresources/yourhtmlpage.html"
                data: encodeURIComponent(qs)
            });
        });
    }
    catch (e) {
        throw e;
    }


Thats it.


Conclusion:

This is how we want to display HTML image using Side Pan in DataVerse/MSCRM

Saturday, October 16, 2021

Share Records with Permission using Web API in Dataverse or MSCRM


Introduction 

In this Blog we will see how to share a Row/Record with permission using Web API JavaScript


Scinario:

Consider we have an Contact Field in Account Entity. then On save of record i need to take the Respective Contact and Share the Account Owner to Contact Owner.


Parameter For Sharing Record

Read : ReadAccess

Write : WriteAccess

Append : AppendAccess

Append To : AppendToAccess

Create : CreateAccess

Delete : DeleteAccess

Share : ShareAccess

Assign : AssignAccess


JavaScript code for Implementing:


function shareUserOrTeamtoRecord(executionContext) {
    var context = executionContext.getFormContext();
    var target = {
        "contactid": "ACAAB842-21C7-E811-A96F-000D3A16A41E", // Pass your respective Record id
        "@odata.type": "Microsoft.Dynamics.CRM.contact" // Pass your respective Entity Logical name record type
    };

    // Sharing with Team
    var principalAccess = {
        "Principal": {
            "teamid": "d272654b-57f5-4564-8d0b-36d0d4c426c4",
            "@odata.type": "Microsoft.Dynamics.CRM.team"
        },
        "AccessMask": "ReadAccess, WriteAccess"
        //Access Mask Sample "ReadAccess, WriteAccess, AppendAccess, AppendToAccess, CreateAccess, DeleteAccess, ShareAccess, AssignAccess"
    };

    // Sharing with User
    var principalAccess = {
        "Principal": {
            "teamid": "d272654b-57f5-4564-8d0b-36d0d4c426c4",
            "@odata.type": "Microsoft.Dynamics.CRM.team"
        },
        "AccessMask": "ReadAccess, WriteAccess"
        //Access Mask Sample "ReadAccess, WriteAccess, AppendAccess, AppendToAccess, CreateAccess, DeleteAccess, ShareAccess, AssignAccess"
    };

    var parameters = {
        "Target": target,
        "PrincipalAccess": principalAccess
    };

    var req = new XMLHttpRequest();
    req.open("POST", context.getClientUrl() + "/api/data/v9.0/GrantAccess", true);
    req.setRequestHeader("OData-MaxVersion", "4.0");
    req.setRequestHeader("OData-Version", "4.0");
    req.setRequestHeader("Accept", "application/json");
    req.setRequestHeader("Content-Type", "application/json; charset=utf-8");
    req.onreadystatechange = function () {
        if (this.readyState === 4) {
            req.onreadystatechange = null;
            if (this.status === 204) {
                //Success - No Return Data - Do Something
            } else {
                var errorText = this.responseText;
                //error response
            }
        }
    };
    req.send(JSON.stringify(parameters));
}


Conclusion:


That's it :) This is how we need use above JavaScript to implement Record Sharing using WebApi.


Tuesday, October 12, 2021

Open URL in PowerApps/Dataverse/MSCRM form Using JavaScript


Introduction:


In this blog we will see how to write Javascript to Open URL in PowerApps/MSCRM/Dataverse Environment.


Implementation Steps:


Syntax:


Xrm.Navigation.openUrl(url,openUrlOptions)


Consider am having a field in an Account Entity Called URL. Then in Onload of Page, if URL Field Contains Data Open another Page with URL


To Begin with i created a Field Called URL in Account Form

rampprakash_0-1634019498527.png


Then Create a WebResource File with Type as JS

rampprakash_1-1634020115162.png


function openURLOnLoad(executionContext) {
    var formContext = executionContext.getFormContext();
    if (formContext.getAttribute("cr608_url").getValue() != null) {
        var URL = formContext.getAttribute("cr608_url").getValue();
        var openUrlOptions = {
            height: 800,
            width: 800
        };
        Xrm.Navigation.openUrl(URL, openUrlOptions);
    }
}


Then Call the function in OnLoad Opearation


rampprakash_2-1634020208004.png


Save and then Publish


Create a Record in Account Entity 

rampprakash_3-1634020285670.png


Save then Refresh the Form


rampprakash_4-1634020327591.png


That's it :slightly_smiling_face:


Video For your Reference: Watch it and Subscribe it :slightly_smiling_face:


Day 11 - Customizing Option Sets Dropdown Fields with JavaScript

  In this Blog, we will see how to Customizing Option Sets Dropdown Fields with JavaScript label1 = formContext.getAttribute( "bosch_op...