Monday, April 4, 2022

How to Enable or Disable AUTO SAVE in Model Driven Apps/MSCRM/Dataverse

Introduction:


In this Blog we will see how to Enable/Disable Auto Save functionality in MSCRM or Model Driven Apps


Implementation Steps:


1. Navigate to https://make.powerapps.com


2. Click Apps --> Open your Model Driven Apps


3. If the Model Driven Apps is not Available then Once Navigated to Point 1 --> Click Gear Icon at the Top --> Click Advance Settings

rampprakash_0-1649060672102.png


4. Once Advanced Settings Page Loaded --> Click Settings --> Click Administration


rampprakash_1-1649060761952.png


5. Then Select System Settings


rampprakash_2-1649060788899.png


6. It Will Open a Popup


7. In the General Tab You will see an option called ENABLE AUTO SAVE ON ALL FORMS


rampprakash_3-1649060828190.png


Select Yes or No based on Our Needs.


Yes --> It will Automatically Saves once you changed the value

No --> You need to Forcefully Click on Save Button to Save the Record.


That's it :slightly_smiling_face:

How to find Difference between two dates in Days with calculated fields in Model Driven Apps

Introduction:


In this Blog, we will see how to find difference between two date in Days using Calculated fields in Model Driven Apps.


Implementation Steps:


1. Navigate to https://make.powerapps.com


2. Click Solutions (if Already Available) else create a new Solution and add New Table or Existing Table


3. Create a new Field inside that Table (Start Date)


rampprakash_0-1649055496006.png


4. Create another field called End Date 


rampprakash_1-1649055496009.png


5. Save the Table


6. Create a Whole Number Field as Calculated


rampprakash_2-1649055496013.png


7. Click Calculation --> It will save the table and open a Separate Tab.


8. Once the Page Opens add following Condition

  •    Start Date Contains Data
  •    End Date Contains Data

9. Add DiffInDays (It is used to find difference between two dates)


10. Write below Query in the Action Field


DiffInDays(cr2f9_startdate, cr2f9_enddate)


rampprakash_3-1649055496016.png


11. Now add 

  • Start Date
  • End Date
  • Difference in Date 

Fields into the Form.


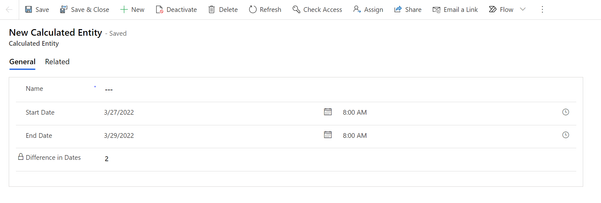
12. Open a new Record and Input Date and Click Save


Positive Number : (End Date is Future)


rampprakash_0-1649055863103.png


Negative Number : (End Date is Past)


rampprakash_0-1649055768894.png


That's it :slightly_smiling_face:

Friday, April 1, 2022

Hide Command Bar using JavaScript in Model Driven App

Introduction:


In this Blog, we will see how to hide Navigation Bar in Model Driven App using JavaScript.


Implementation Steps:


When ever you tried to create a new Record, you will be redirected to a page like below


rampprakash_0-1648728054363.png


Red Color Highlighted Called Command Bar


If we want to hide that Command Bar follow below steps to achieve the same.


1. Navigate to https://make.powerapps.com

2. Click Solutions --> Create a new Solution

3. Click New --> Click More --> Select Web Resource and add a new Web Resource


rampprakash_1-1648728360258.png

4. Write below code in Web Resource


function onLoadHideCommandBar(executionContext) {
    var formContext = executionContext.getFormContext();
    formContext.ui.headerSection.setCommandBarVisible(booleanValue);
}


booleanValue : pass true or false as an option


true - visible Command bar

false - hide Command bar


Once Code Published:


Load or Open a new Record


rampprakash_0-1648836606039.png


Now you cannot see the Navigation Bar.


That's it :slightly_smiling_face:


Friday, March 25, 2022

How to validate weather the number is Positive or Negative in Canvas Application

Introduction: 


In this blog we will see how to check weather number is POSTIVE or NEGATIVE in CANVAS APP


Implementation Steps:


1. Navigate to https://make.powerapps.com


2. Click Apps --> Click New --> Select Canvas App --> Choose Tablet/Phone based on your needs --> Enter name and Click Ok


3. Add Label and Name it as INPUT NUMBER


4. Add Text Box and Change format to NUMBER (Name it as txtnumber)


5. Add Submit Button

rampprakash_1-1648220271696.png


6. On Select of Submit Button Write Below Code


If(Value(txtnumber.Text)>0,Notify("Enter Number " & txtnumber.Text & " is Positive",NotificationType.Success),Notify("Enter Number " & txtnumber.Text & " is Negative",NotificationType.Success))


Testing:


Input Number : 5 and Submit


rampprakash_2-1648220437390.png


Input Number : -5 and Submit


rampprakash_3-1648220463497.png


That's it :slightly_smiling_face:


Tuesday, March 22, 2022

How to Customize Tool Tip for a Field in Model Driven Apps

Introduction:


In this Blog we will see how to Add or Customize Tool Tip for a Field in Model Driven Apps or CRM


Implementation Steps:


1. Navigate to https://make.powerapps.com

2. Click Data

3. Click Tables

4. In this Scenario am taking Account table as an Example

     --> Create a New Field

rampprakash_0-1647946203193.png


I Created a Field Called Tool Tip


5. Once the Field Gets Created --> Add that Field in the Form.


6. Once Field Gets Added --> if you open a record you will see Default Tool tip will populate the Display Name.


rampprakash_1-1647946381803.png


Let's see how we can customize this.


7. Open the Created Field --> Fill the Description Field


rampprakash_2-1647946464825.png


8. Save and Publish it Again


9. Now Open a Record --> Move Hover to the Field


rampprakash_3-1647946520890.png


That's it :slightly_smiling_face:


Monday, March 21, 2022

Form Notification in Model Driven Apps Using JavaScript

Introduction:


In this blog we will see how to show Form Notification using JavaScript in Model Driven Apps.


Scenario:

Consider i have an Account Screen, with Annual Revenue field as 5000, if the value exceed more than 5000 i need to show an Notification.


rampprakash_0-1647868347721.png


Implementation Steps:


1. Create a WebResource 

2. Open the JavaScript (Web Resource which you have Created).


Creating WebResource:


rampprakash_1-1647869035635.png


Adding Web Resource to Form


rampprakash_2-1647869115049.png


In My Scenario, am triggering alert on Change of Field Value.


 So, Open the Form --> Click on the Field --> Click Events --> Then Input the Event name (Function name) and WebResource where the Function residing --> Save --> Publish


rampprakash_3-1647869168393.png


Write the below Code in the JavaScript


function onChange(executionContext){
var formContext = executionContext.getFormContext();
if(formContext.getAtrribute("annualrevenue").getValue()>5000){
formContext.ui.setFormNotification("Annual Revenue should be less than 5000", "INFO", "1");
}
else{
formContext.ui.clearFormNotification("1")
}
}


Notification Pop-up:


rampprakash_4-1647869413150.png


No Notification(Because we are Clearing the Notification):


rampprakash_5-1647869439486.png


Once written above code, just save and publish.


That's it :slightly_smiling_face:

Thursday, March 10, 2022

Create Notes / Move Notes and Attachments from One Entity to another

Introduction:

In this blog we will see how to move Notes from One Entity to Another

Implementation Steps:


Consider when ever I Qualify a Lead to Contact, I need to Move the Respective Lead(Notes/Attachment) from Lead to Contact.


Let's see how can we do that.


Create a Plugin 


string getNotes = @"<fetch version='1.0' output-format='xml-platform' mapping='logical' distinct='false'>
  <entity name='annotation'>
    <all-attributes />
    <order attribute='subject' descending='false' />
    <link-entity name='lead' from='leadid' to='objectid' link-type='inner' alias='aa'>
      <filter type='and'>
        <condition attribute='leadid' operator='eq' value='{objectid}' />
      </filter>
    </link-entity>
  </entity>
</fetch>";

                getNotes = getNotes.Replace("{objectid}", "LEADGUID");
                EntityCollection collectNotes = service.RetrieveMultiple(new FetchExpression(getNotes));

                foreach (var loopColelctNotes in collectNotes.Entities)
                {
                    Entity _annotation = new Entity("annotation");
                    _annotation.Attributes["objectid"] = new EntityReference("contact", getContactDetails.Id);
                    _annotation.Attributes["objecttypecode"] = "contact";
                    if (loopColelctNotes.Attributes.Contains("subject"))
                    {
                        _annotation.Attributes["subject"] = loopColelctNotes.Attributes["subject"];
                    }

                    if (loopColelctNotes.Attributes.Contains("documentbody"))
                    {
                        _annotation.Attributes["documentbody"] = loopColelctNotes.Attributes["documentbody"];
                    }

                    if (loopColelctNotes.Attributes.Contains("mimetype"))
                    {
                        _annotation.Attributes["mimetype"] = loopColelctNotes.Attributes["mimetype"];
                    }

                    if (loopColelctNotes.Attributes.Contains("notetext"))
                    {
                        _annotation.Attributes["notetext"] = loopColelctNotes.Attributes["notetext"];
                    }

                    if (loopColelctNotes.Attributes.Contains("filename"))
                    {
                        _annotation.Attributes["filename"] = loopColelctNotes.Attributes["filename"];
                    }

                    service.Create(_annotation);

                }


Trigger the above code on Create of an Entity in Async Operation.

Day 11 - Customizing Option Sets Dropdown Fields with JavaScript

  In this Blog, we will see how to Customizing Option Sets Dropdown Fields with JavaScript label1 = formContext.getAttribute( "bosch_op...